16 Dazzling Glitter Christmas Nail Ideas That’ll Steal the Spotlight This Holiday!
Let’s talk holiday glam. You’re scrolling through your feed, seeing all the festive looks, and you know your manicure needs to be the main character this season, right?
Forget subtle; it’s time to sparkle. I’ve been obsessed with finding the best Glitter Christmas Nail Ideas, and let me tell you, the options are endless.
Whether you’re a full-coverage glitter fan or just want a tiny twinkle, these Christmas Nail Inspirations are about to become your entire personality for the next month.
So, grab your favorite polish (or just screenshot these for your nail tech), because we’re diving into the most fabulous Glitter Nails for the holidays.
Ready to shine? Lets do it!!
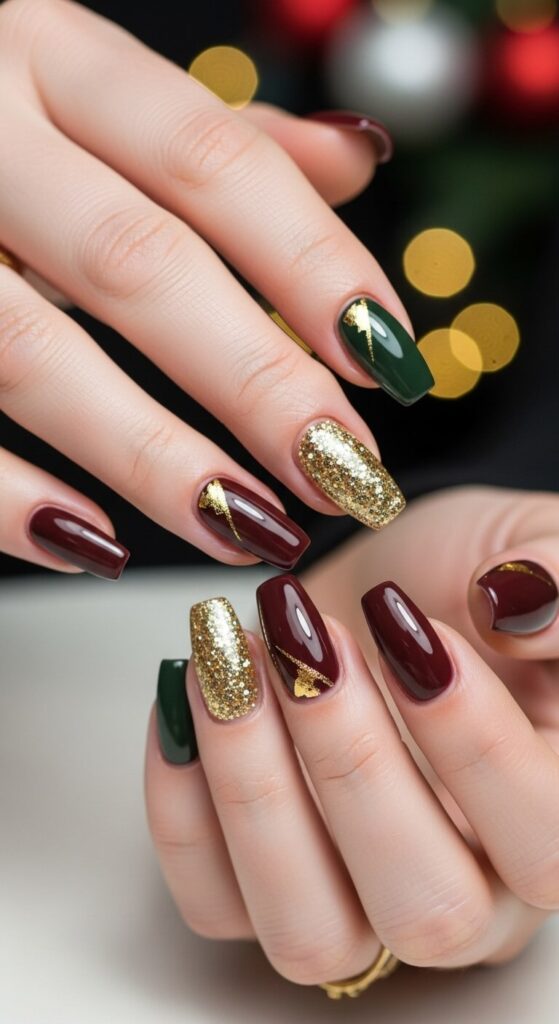
1. Classic Crimson & Gold Glitter Tips
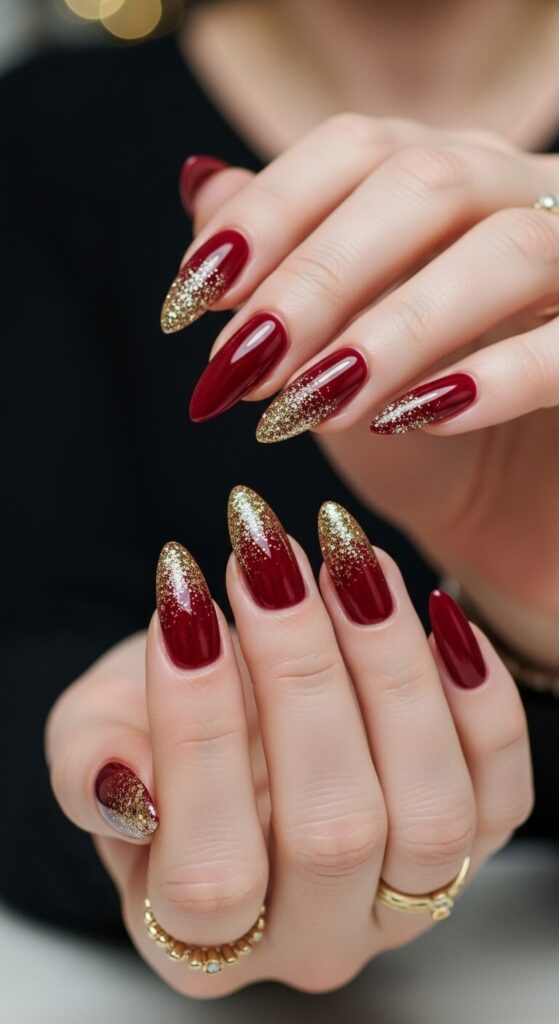
This is the little black dress of holiday manicures, but make it sparkle. A deep red base with just the tips dipped in gold glitter is effortlessly chic. It’s festive without trying too hard, you know?
Why it’s a must-try:
- It’s a modern twist on the classic French manicure, making it feel fresh and party-ready.
- The combo of red and gold is literally the definition of holiday cheer.
- It’s surprisingly low-maintenance; as your nails grow out, it doesn’t look nearly as awkward as a solid color.
- Perfect for literally any holiday event, from a work party to Christmas morning.
Pro Tip:
Use a thin nail art brush or even a bobby pin to create a crisp, clean line where the glitter begins. Trust me, it makes all the difference between “DIY” and “salon-quality.”
2. Emerald Green with a Glitter “Fade”
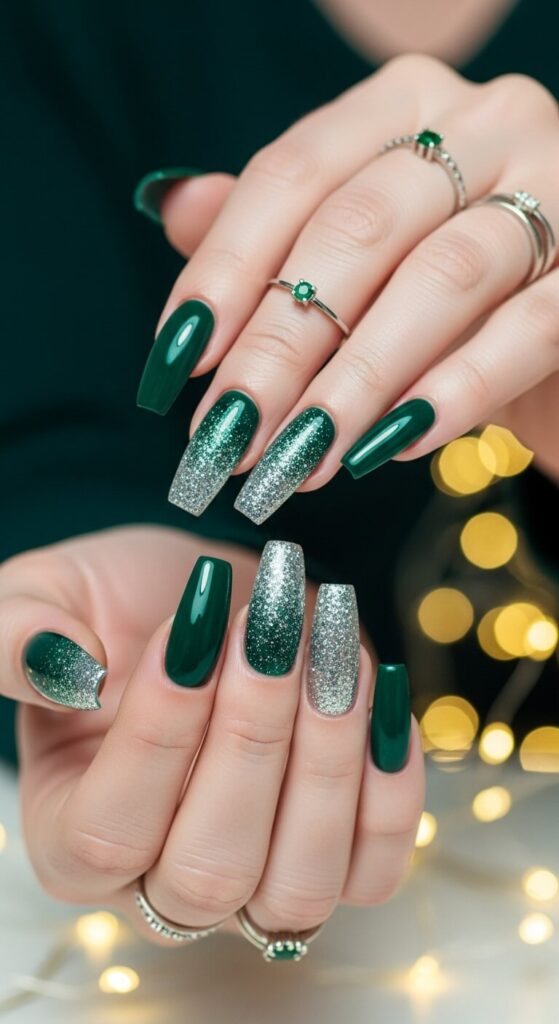
Green is having a major moment, and this deep emerald shade is pure luxury. Adding a glitter fade at the cuticle gives it a magical, ombré effect that’s just chef’s kiss.
How to get the look:
- Paint your entire nail with a rich emerald green polish.
- While it’s still tacky, use a small makeup sponge to dab glitter polish starting at the base, fading it upwards.
- You can use a clear top coat to help blend the glitter seamlessly into the green.
- This technique looks complicated but is totally doable with a little patience.
3. Snow Globe Nails with Chunky Glitter

Want to literally wear a winter wonderland on your fingertips? This is your look. A milky white base with chunky, iridescent glitter flakes looks exactly like a snow globe shook itself onto your nails.
Why it works:
- The milky base mimics the cloudy water in a snow globe, creating an incredible 3D effect.
- Chunky glitter pieces catch the light from every angle, making your hands look magical.
- It’s a super fun, conversation-starting design.
- It pairs perfectly with any sparkly outfit or jewelry.
Downside:
Okay, full disclosure, chunky glitter is a nightmare to remove. Soak a cotton pad in polish remover, hold it on each nail for a minute, and maybe watch a funny video to distract yourself from the mild frustration.
4. Glitter Gradient Over Nude
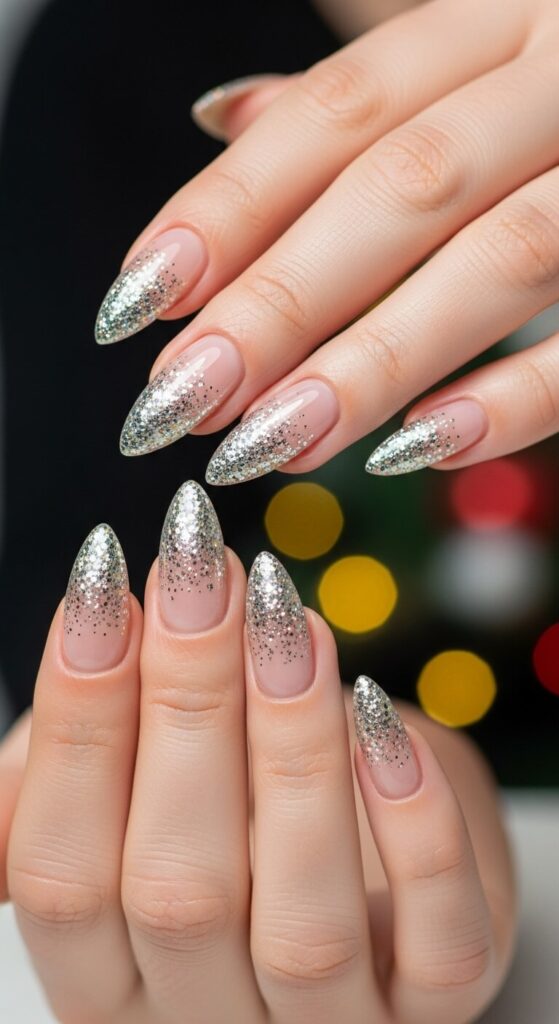
For my friends who love a more understated sparkle, this one’s for you. A soft nude base with a glitter gradient at the tips gives you all the glamour without being too “in your face.”
Why this idea is so genius:
- It elongates your fingers and makes your nails look instantly more elegant.
- The nude base makes the glitter pop while keeping the overall look sophisticated.
- It’s the perfect compromise if your workplace has a “no crazy nails” policy.
- It grows out so gracefully, you can probably get away with it for two full weeks.
Pro move:
Use a fine, holographic glitter for the gradient instead of a chunky one. It gives a more subtle, ethereal sparkle that looks like fairy dust.
5. Candy Cane Stripes
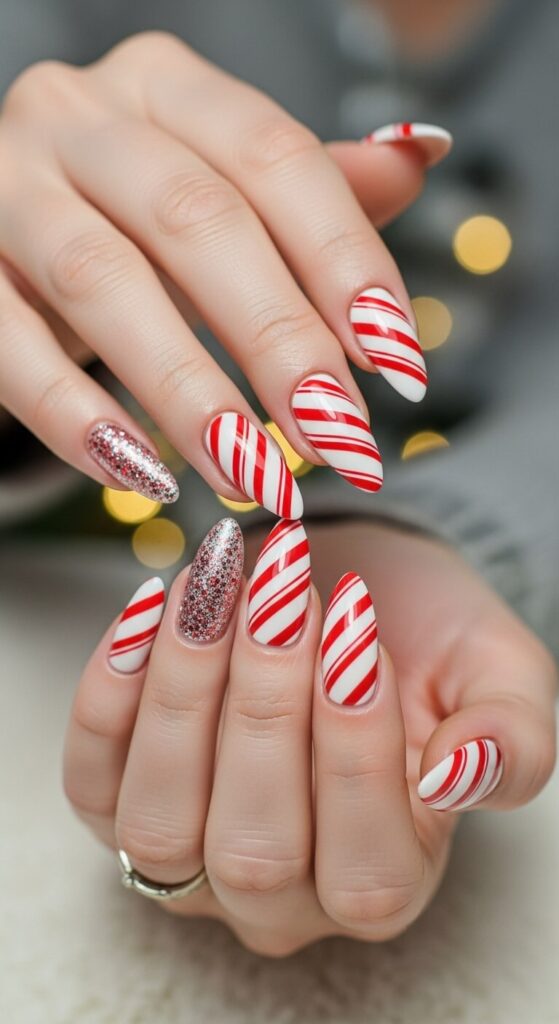
Is it even Christmas without candy canes? This design is playful, festive, and so darn cute. A glossy red and white striped pattern with a sprinkle of glitter? Yes, please.
How to nail it:
- Start with a solid white base and let it dry completely.
- Use nail striping tape or a very thin brush to paint perfect red stripes.
- For the glitter version, paint one or two stripes with a red glitter polish instead.
- Seal it all with a thick top coat to smooth everything out.
Story time:
I attempted this freehand once and let’s just say my stripes looked more like abstract art. Nail tape was a game-changer and saved my sanity. Learn from my mistakes!
6. “Gilded” Glitter Accent Nail
Sometimes, less is more, but more is also fun. This idea lets you have it both ways. Paint all your nails a solid, festive color and then go all out with a full glitter bomb on your ring finger.
Why it’s a must-try:
- It’s balanced. You get a major pop of sparkle without it feeling overwhelming.
- It draws attention to your hands, especially if you wear rings.
- It’s a fantastic way to use a bold glitter polish that might be too much for a full set.
- Super easy to do at home, even if you’re all thumbs.
Personal fave:
My go-to combo is a deep burgundy on four nails and a rose gold glitter on the accent nail. It feels expensive and looks incredible against holiday party lighting.
7. Midnight Sky Glitter Flakes
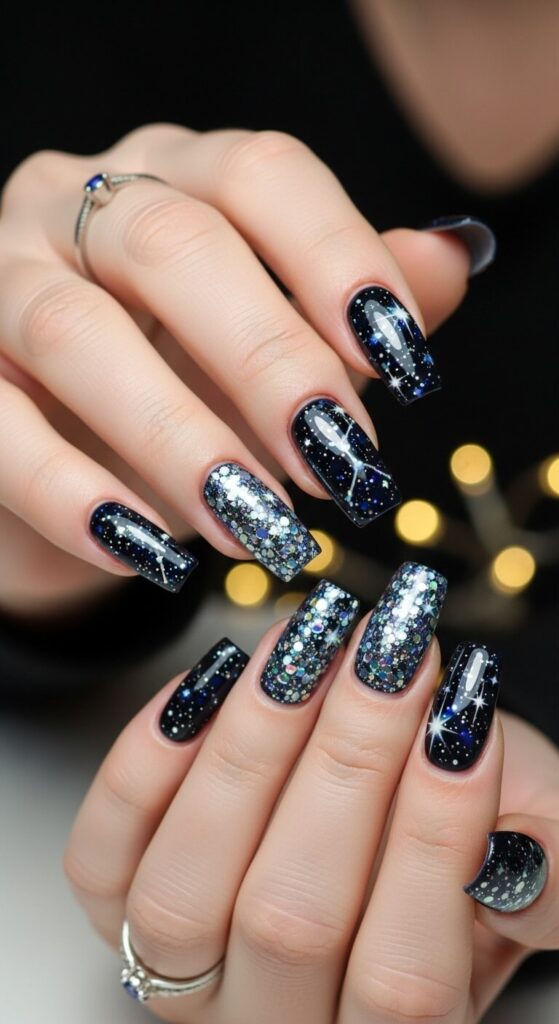
Imagine the deepest, darkest night sky right before Christmas… now put it on your nails. A black or navy blue cream base with scattered silver glitter flakes creates a stunning, starry-night effect.
Design ideas:
- Use different sizes of glitter to mimic twinkling stars—some big, some small.
- You can even add a tiny silver crescent moon on your accent nail for extra drama.
- This look is incredibly versatile and works for a New Year’s Eve party, too.
Pro Tip:
Don’t just paint the glitter on randomly. Use a dotting tool to place a few of the larger flakes deliberately. It gives you more control over the final “constellation” look.
8. Festive Glitter French

We already touched on glitter tips, but let’s elevate it. Instead of a solid glitter line, try a delicate glitter “freckle” along the tip. It’s like your nails are blushing with holiday spirit.
How to achieve it:
- After painting your classic French tip (white or nude), take a small dotting tool.
- Dip it in your glitter polish and gently press it along the smile line.
- Space the dots out unevenly for a more organic, whimsical feel.
- This works beautifully over a traditional white tip or a colored one.
Personal take:
This is my favorite “gateway glitter” design for friends who are usually scared of sparkle. It’s just a little wink of festivity.
9. Plaid Perfection
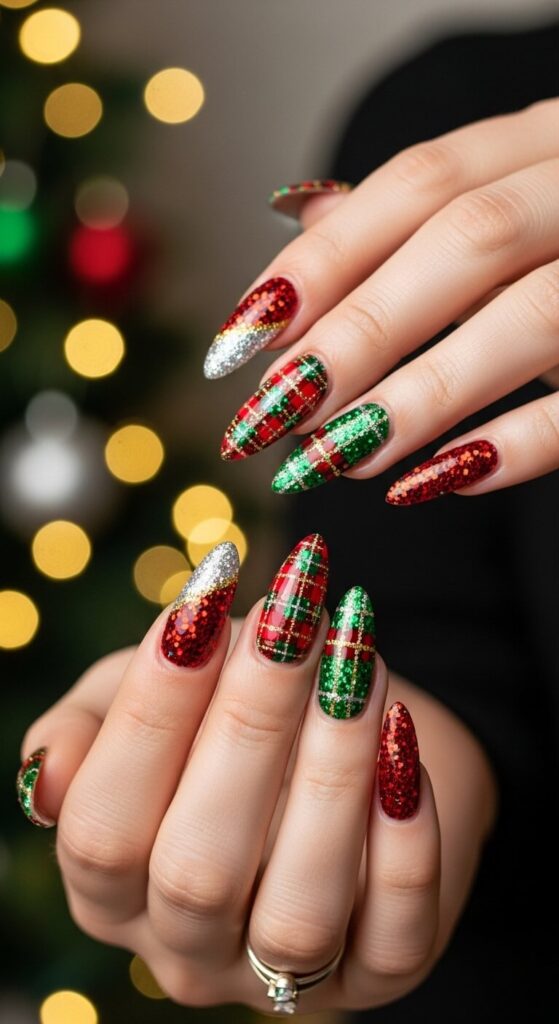
Channel your inner cozy Christmas vibe with a plaid design. A classic red and black or green and white plaid pattern, with one line of the check done in glitter, is pure genius.
Why it works so well:
- It combines a traditional holiday pattern with a modern, textured element (the glitter).
- It looks incredibly intricate and difficult, earning you major style points.
- The mix of matte color and sparkle creates fantastic visual interest.
- It’s the perfect manicure to go with your favorite wool sweater.
Downside:
This is 100% a “book an appointment with your nail tech” design unless you have the steady hands of a surgeon. IMO, it’s worth every penny.
10. Glitter “Caviar” Beads
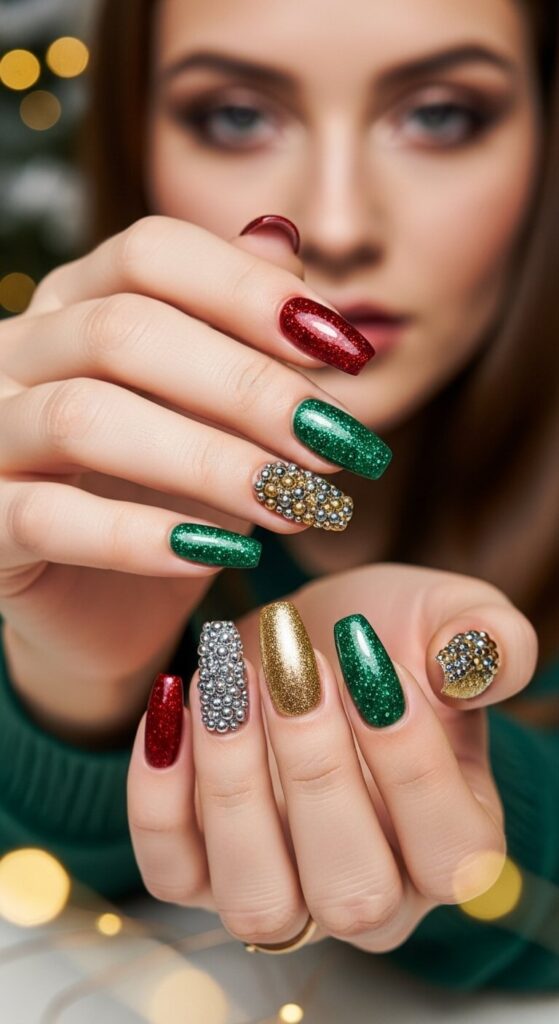
Ready to get tactile? Glitter caviar beads are tiny, ball-shaped glitters that you press onto a tacky base coat. The result is a textured, dazzling surface that’s unlike any polish.
Why it’s a showstopper:
- The 3D texture is incredibly unique and feels amazing to touch.
- It has a maximum sparkle factor that reflects light in every direction.
- It’s a fun, crafty project if you’re doing your nails at home.
- Perfect for a statement accent nail on New Year’s Eve.
Pro move:
After applying the beads, carefully wrap the tips of your nails with the beads to prevent premature chipping. And always, always seal it with a gel top coat for longevity.
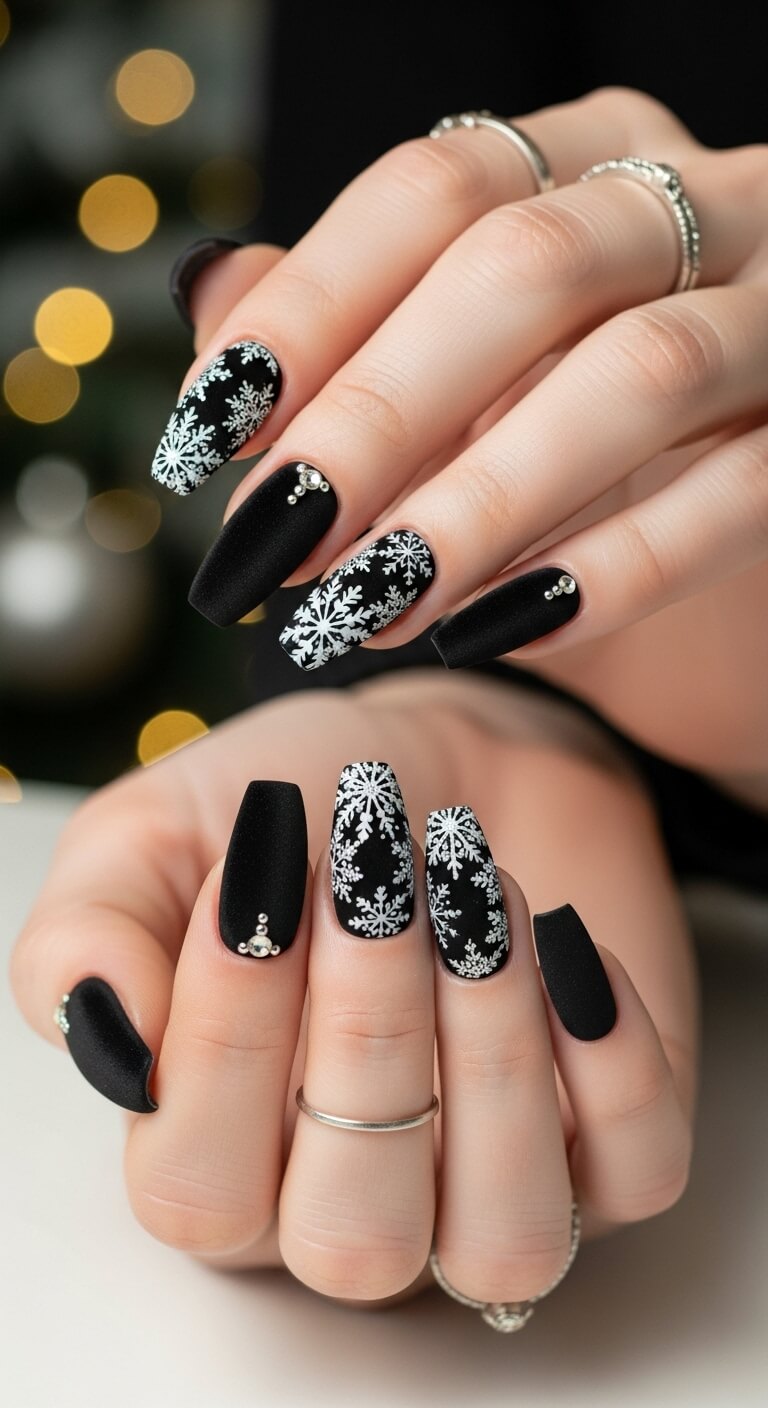
11. Holiday Glitter Stamping

Nail stamping is the secret weapon for perfect, intricate nail art. There are so many holiday-themed plates—think snowflakes, reindeer, and holly—that you can stamp on in glitter polish.
How to make it easy:
- Invest in a good stamping kit; the special polishes and scraper make all the difference.
- Practice the rolling motion on a piece of paper first.
- You can stamp over any solid color for a custom look in minutes.
- It’s the fastest way to get salon-level art at home.
Personal fave:
I love stamping a single, delicate snowflake in silver glitter on a navy blue base. It’s elegant, festive, and takes about 30 seconds per nail after the base color dries.
12. Glitter “Cuticle” Moon Manicure

Flip the script on a classic. Instead of glitter at the tips, focus the sparkle at the cuticles in a moon shape. It’s retro, cool, and seriously fashion-forward.
Why this idea is so cool:
- It’s a unexpected take on holiday nails that will make you stand out.
- It looks amazing on shorter nail lengths.
- You can pair a glitter moon with a metallic crescent for a super chic look.
- It feels very editorial, like you just stepped out of a fashion magazine.
Pro Tip:
Use hole reinforcement stickers to create the perfect half-moon shape at your cuticle. Paint the glitter over your base color and then peel the sticker off for a flawless line.
13. Mistletoe Magic
Bring a literal piece of Christmas folklore to your nails. A deep green base with tiny mistletoe sprigs painted in white and accented with red glitter “berries” is just adorable.
Design ideas:
- You can paint a full mistletoe branch across a few nails or just a small sprig on an accent nail.
- Use a dotting tool for the perfect red glitter berries.
- This design pairs beautifully with solid glitter nails in complementary colors.
Story time:
I wore this design last year and my nephew, in all his five-year-old wisdom, tried to “pick the berries” off my thumb. So, maybe not the best for babysitting, but a huge hit with adults!
14. “Foil” and Glitter Effect
This look mimics the fancy foil wrapping paper. Use a metallic silver or gold as your base and add patches of contrasting glitter to create a crumpled foil effect. It’s edgy and festive.
How to get the look:
- Paint your nails with a metallic chrome polish.
- Before it dries, use a sponge to dab on patches of glitter polish randomly.
- The goal is an imperfect, textured look, so don’t overthink it!
- This method works best with gel polishes that don’t dry until you cure them.
Personal take:
This is my go-to when I want to feel like a rockstar at a holiday concert. It’s bold, a little messy in the best way, and catches the light like nothing else.
15. Sweater Weather Texture
Why should your nails be left out of the cozy sweater trend? A matte, creamy base (like off-white or burgundy) with a glitter “cable knit” pattern stamped or painted on top is the epitome of hygge.
Why it works:
- The mix of matte and glitter finishes is visually stunning.
- It literally looks like you’re wearing a tiny, sparkly sweater on each nail.
- It’s a warm, inviting, and incredibly unique design.
- Perfect for those cold, cozy nights by the fire.
Pro move:
After you finish the design, use a matte top coat over the entire nail. This will make the creamy base truly matte and make the glitter cables pop even more. It’s a seriously cool effect.
16. Negative Space & Glitter
For a truly modern manicure, play with negative space. Leave parts of your natural nail exposed and fill other sections with bold blocks of glitter. It’s artistic and fresh.
Why it’s a must-try:
- It makes your manicure look incredibly current and fashion-conscious.
- It’s a great way to make glitter feel less heavy and more minimalist.
- As your nails grow, the design still looks intentional.
- The contrast between your natural nail and the dense glitter is just so cool.
Pro Tip:
Use nail vinyls or good old-fashioned scotch tape to create sharp, clean lines for the negative space. Just make sure your base color is completely dry before you apply the tape, or you’ll have a sticky mess.
Wrap Up
And that’s the glitter-filled lineup! I hope these ideas have you as excited as I am to get a festive manicure that truly captures the holiday magic.
We’ve covered everything from subtle shimmer to full-on glitter bombs, so no matter your style, there’s a perfect Glitter Christmas Nail Idea here with your name on it.
As you sip your hot cocoa and finalize your own Christmas Nail Inspirations, just remember that the best accessory this season is a confident smile and a hand covered in fabulous Glitter Nails.
So, which design are you saving for Christmas Day? Whichever it is, you’re going to look absolutely amazing.
Now, if you’ll excuse me, I have a date with a bottle of gold glitter polish.
Happy holidays and happy painting!